
Camera Fundamentals
Filming on a mobile device is principally no different from filming with any other form of camera; as such, we need to understand the terminology involved with cinematography to get the best out of our camera and achieve the type of shots we desire. Filming outdoors in daylight is very different from filming indoors in darkness, and the better we can understand our settings, the better the final results will be. To start with, a fundamental understanding we should have is understanding the Exposure Triangle and the composing parts to make a balanced, in focus and correctly exposed image before then moving onto frame rates and formats.
Aperture
Aperture refers to the opening in your camera lens that lets light in. Think of it like the pupil of your eye: it widens in the dark to let in more light and narrows in bright conditions to reduce light intake.
It’s measured in f-stops, like f/1.8, f/4, f/16, etc.
Wide Aperture (e.g., f/1.8)
Big opening = more light
Shallow depth of field = blurry background
Great for low light and portraits
Narrow Aperture (e.g., f/16)
Small opening = less light
Deep depth of field = everything in focus
Ideal for landscapes and architecture
An f-stop (or f-number) represents the aperture size of your lens—the opening that lets light into your camera. It’s written as f/x, like f/2.8, f/5.6, or f/16.
Smaller f-number (e.g. f/1.8) = larger aperture = more light enters
Larger f-number (e.g. f/16) = smaller aperture = less light enters
It’s a bit counterintuitive: lower numbers mean bigger openings, and higher numbers mean smaller openings.
The formula for F-Stop scale is:
The f-number is a ratio: f-stop = focal length ÷ diameter of aperture
So if you have a 50mm lens and the aperture is 25mm wide: 50 ÷ 25 = f/2
This ratio helps standardise exposure across different lenses.
ISO
ISO refers to your camera sensor’s sensitivity to light. It’s one of the three key settings in the Exposure Triangle, alongside aperture and shutter speed. We ideally want to work with a low ISO value and compensate using more lighting in our scene to try and keep noise (digital artefacts) to a minimum. Some mobile phones will attempt to compensate for noise using algorithms but this often softens the image which can remove details.
If image is too dark and lighting the scene can’t be adjusted anymore then you can turn up the ISO but this will start to creep noise into our sensor if aperture and shutter speed are also not adjusted. Try and Avoid Automatic adjustments and use manual adjustments where possible.
Low ISO (e.g., 100–400): Less sensitive to light → cleaner image
High ISO (e.g., 1600–6400+): More sensitive to light → brighter image, but more noise
Daylight Shooting: ISO 100–200 is ideal. You get crisp, noise-free images.
Indoor Scenes: ISO 800–1600 helps brighten the shot without needing extra lights.
Night Filming: ISO 3200+ can reveal details in low light, but expect grain unless you’re using a high-end sensor.

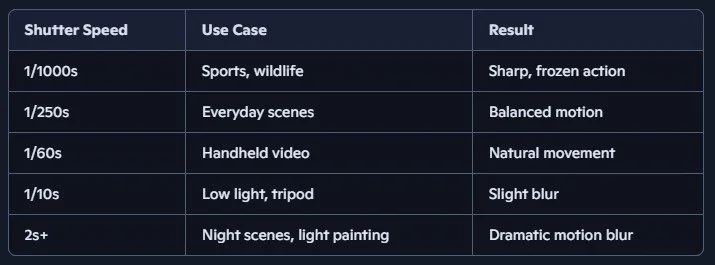
Shutter Speed
Shutter speed refers to how long your camera’s sensor is exposed to light. It’s the duration the shutter stays open when you take a photo or record a frame. Mobile phones typically use an electronic shutter over a physical shutter as such shutter speed options may be more limited than some DSLR and cinematic cameras alternatives.
Fast shutter speed (e.g., 1/1000s): Freezes motion
Slow shutter speed (e.g., 1/30s or 2s): Captures motion blur
Shutter speed affects two key things:
Motion
Fast shutter: Great for sports, wildlife, or any fast action — crisp and frozen.
Slow shutter: Ideal for artistic blur — light trails, waterfalls, or dreamy movement.
Exposure
Longer exposure = more light (brighter image)
Shorter exposure = less light (darker image)
Smartphones often use electronic shutters, but the principle is the same. Apps like FiLMiC Pro let you manually adjust shutter speed for cinematic effects.
Want that cinematic motion blur? Use a shutter speed that’s roughly double your frame rate (e.g., 1/50s for 24fps).
Shooting in bright daylight? You may need ND filters to slow down shutter speed without overexposing.
Shutter speed is a balancing act. If you slow it down for artistic blur, you’ll need a tripod or stabilizer to avoid unwanted shake. And if you speed it up, be ready to compensate with wider aperture or higher ISO. Try and Avoid Automatic adjustments and use manual adjustments where possible.
Exposure Triangle
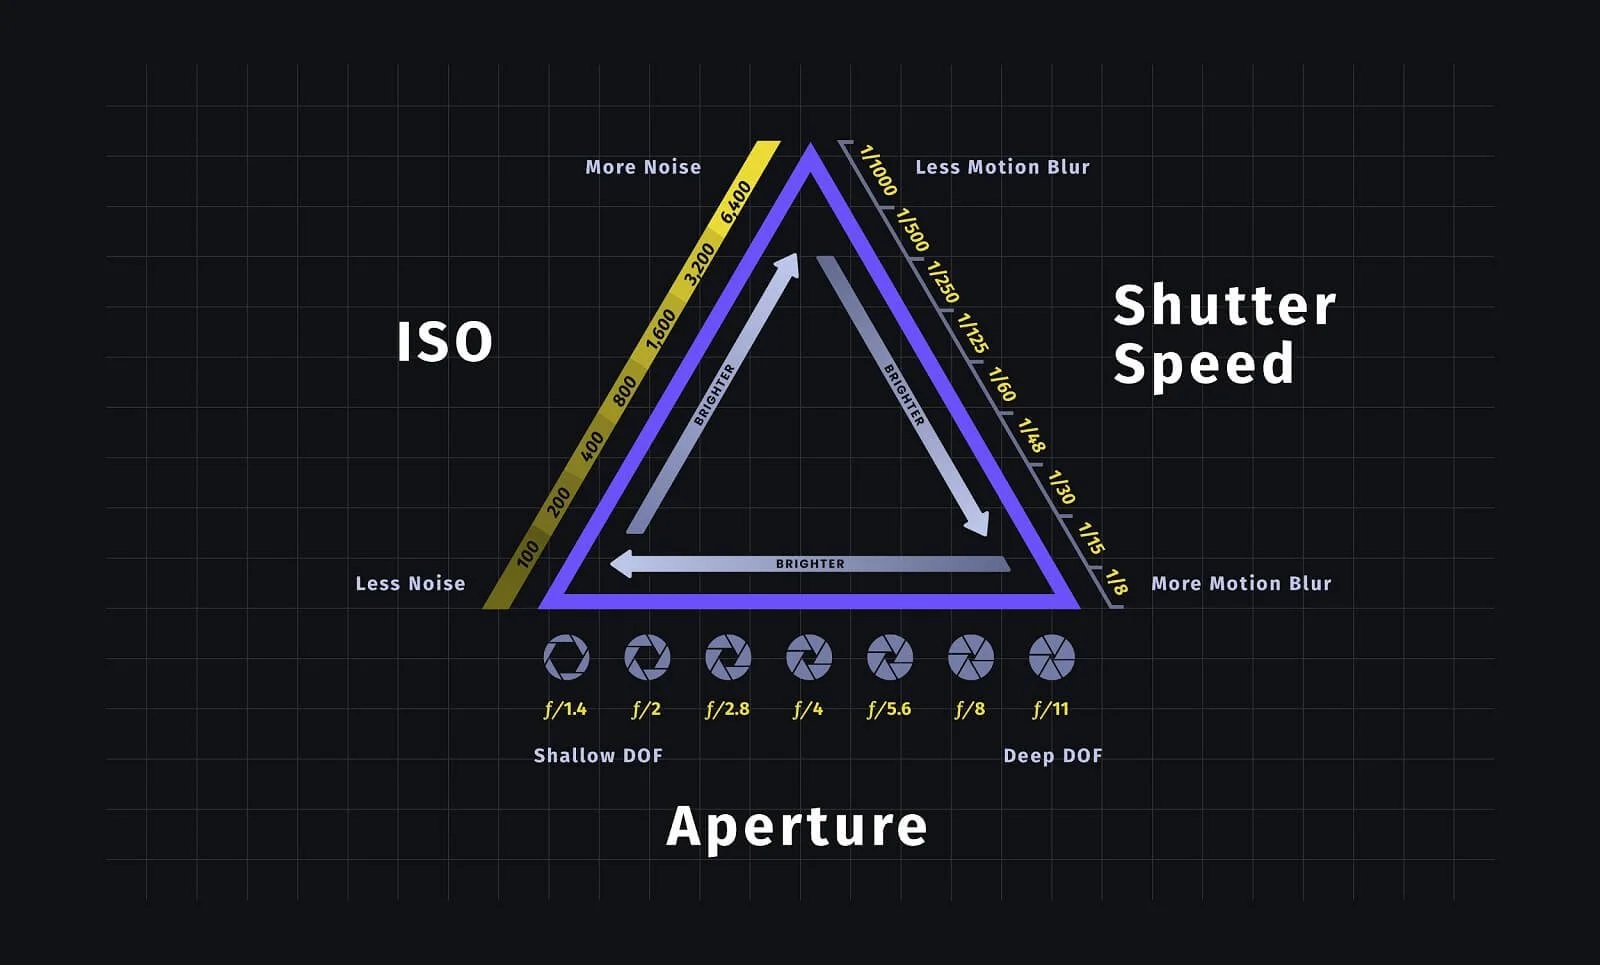
The exposure triangle is the foundation of photography—it’s the relationship between three key settings that control how light interacts with your camera: aperture, shutter speed, and ISO. Mastering this triangle lets you take well-exposed photos in any lighting condition and gives you creative control over how your images look.
Imagine each side of the triangle as a dial. Adjusting one affects the others:
Bright scene? You might use a narrow aperture (f/16), fast shutter speed (1/1000s), and low ISO (100).
Low light? You might open the aperture (f/2.8), slow the shutter (1/60s), and raise ISO (800).
To maintain proper exposure, changing one setting usually means adjusting at least one of the others. For example:
If you open the aperture to let in more light, you might need a faster shutter speed or lower ISO to avoid overexposure.

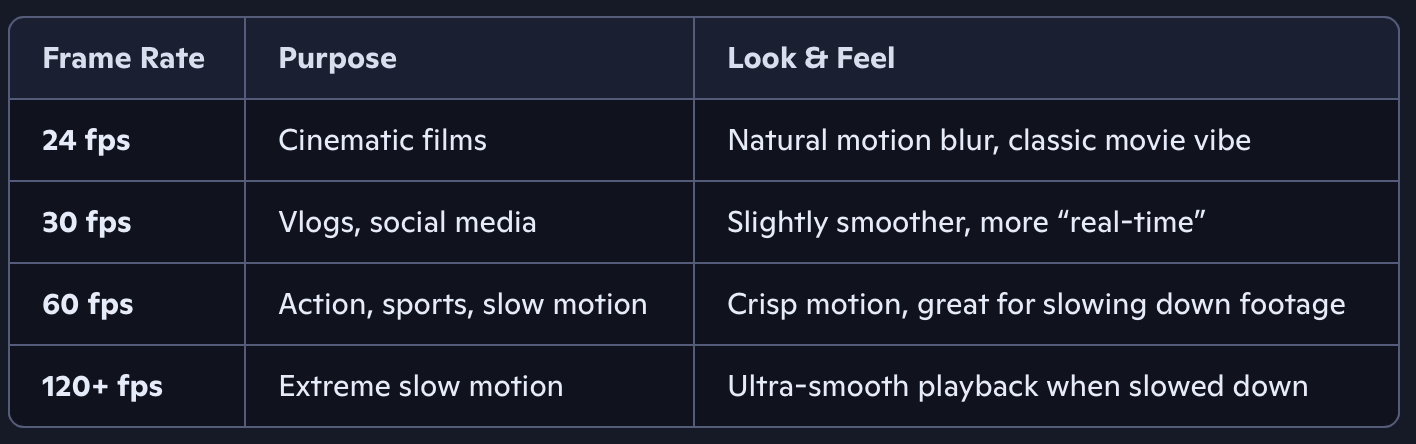
Frame Rate
Frame rate refers to the number of individual images (frames) your camera captures per second. It’s measured in frames per second (fps).
24 fps = 24 frames per second
60 fps = 60 frames per second
The higher the number, the smoother the motion
Frame rate affects both the look of motion and the technical compatibility of your video.
Slow Motion
If you shoot at 60 fps and play back at 24 fps, you get 2.5x slow motion.
Higher frame rates = more flexibility in post-production for slow-mo effects.
Most smartphones let you choose frame rates like:
24 fps for cinematic storytelling
30 fps for casual video
60 fps for action or slow motion
Apps like FiLMiC Pro give you full manual control to lock in your desired frame rate and pair it with the right shutter speed (usually double the frame rate for natural motion blur — e.g., 1/48s for 24 fps).
If you're aiming for a cinematic look, stick with 24 fps. For social media or vlogs, 30 fps is great. And if you're filming fast action or want slow motion, go for 60 fps or higher.
Regional Standards
NTSC regions (e.g., US, Japan): 30 fps or 60 fps
PAL regions (e.g., UK, Europe): 25 fps or 50 fps
IF we were making an animation the frame rates would be lower with drawn animation typically being 12 fps (Animating on twos) or between 8 and 15 for stop motion animation. Higher frame rates can make footage more fluid but also start to look ‘gamified’.
DO NOT MIX FRAME RATES in your final composition as this may make the footage look jarring unless this is a stylistic choice and try and get used to manual camera control over automatic adjustment.