
Production
Mobile Filming Guide

Recommended: The Blackmagic Camera app provides professional manual control over exposure and frame rates, ensuring smooth encoding into DaVinci Resolve.
- 1 Download and open the Blackmagic Camera app on your mobile device using the links above.
- 2 Tap the settings/codec menu to configure your parameters before recording.
- 3 Set your format to MP4 or MOV with a Constant Frame Rate (CFR) like 24fps or 30fps to avoid variable frame rate issues.
- 4 Lock in your manual exposure and focus, then record your footage for seamless DaVinci Resolve compatibility.
Note on Native Apps: Native phone cameras often record using Variable Frame Rates (VFR) or advanced codecs, which can cause severe editing roadblocks.
Why VFR (Variable Frame Rate) is bad for editing:
- Audio/Video Desync: Audio drifts out of sync with lip movements over time.
- Playback Stutter: Editors like DaVinci Resolve struggle to calculate timeline positions, causing lag or crashes.
- Rendering Errors: Final exports can fail or generate corrupted files.
- 1 Open your phone's built-in Camera app.
- 2 Go into your device's main system camera settings and lock your resolution and frame rate (e.g., 1080p or 4K at a steady 30fps). Avoid automatic dynamic frame rate settings if available.
- 3 Record your footage normally.
- 4 If DaVinci Resolve fails to read the files or exhibits audio/video drift due to VFR, bring your footage to the technical team for transcoding.
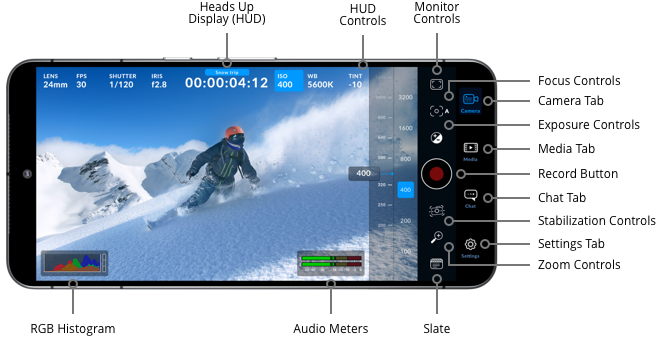
Blackmagic Camera app offers some advanced camera functionality to your mobile phone, offering more advanced features and tools than the default camera applications.
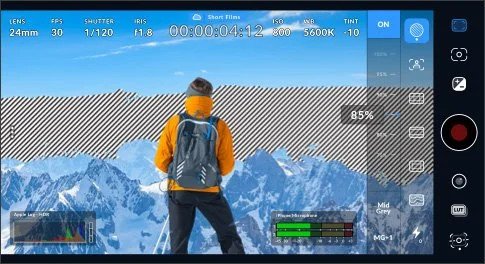
Zebra
The Zebra display will draw diagonal lines over areas of your image with excessive exposure. The variable control, when used with the histogram, lets you see the best exposure for any scene. This helps prevent overexposure, especially when filming outdoors or in bright environments.
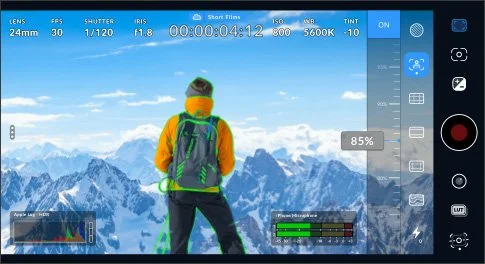
Focus Assist
An extremely powerful feature, focus assist adds a colored highlight to fine image detail, so you can see what parts of the image are in focus. This allows manual focus to be used for cinematic looks.
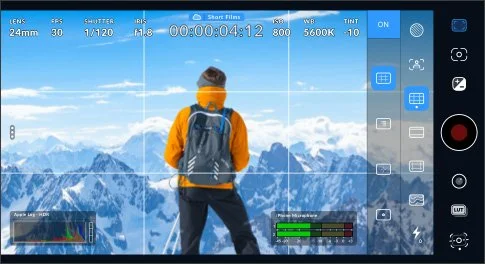
Grids
The grid control adds on-screen markers for framing and positioning items in a shot.
There is a range of on-screen markers, including a rule of thirds grid, crosshair and a centre dot.
To make your project look like a professional movie rather than a casual home video, configure your settings as follows:
1. Resolution & Codec
Resolution: 4K (or 1080p if storage is tight). 4K gives you sharp details and flexibility to crop or stabilize slightly in editing.
Codec: HEVC (H.265). It retains incredible image quality while keeping file sizes manageable for your phone storage.
2. Frame Rate (FPS)
Setting: 24 fps.
Why? 24 frames per second is the global cinematic standard that gives movies their characteristic motion blur and visual rhythm. (Use 60 fps only if you want smooth slow-motion action shots).
3. Shutter Speed / Shutter Angle
Setting: 180° Shutter Angle (or a shutter speed of 1/48s if shooting at 24 fps).
Why? The 180-degree rule dictates that your shutter speed should be double your frame rate. This creates natural, pleasing motion blur when subjects move across the frame. Lock this setting so it doesn't fluctuate.
4. ISO & White Balance (WB)
ISO: Keep this as low as possible (e.g., ISO 50–100 outdoors) to eliminate digital grain/noise.
White Balance: Do not leave this on Auto, or your colors will shift mid-shot. Choose a manual preset matching your environment (e.g., Daylight/5600K for outdoors, Tungsten/3200K for indoor bulbs) and lock it.
Shutter Speeds & Shutter Angles Guide:
The 180° Shutter Rule (Cinematic Standard)
In traditional film cameras, a rotating mirrored disk with a 180-degree opening exposes each frame. At 24 fps, a 180° shutter angle equals a 1/48s shutter speed. This creates the natural, pleasing motion blur that audiences associate with high-end cinema.
Shutter Speed vs. Shutter Angle
While digital video cameras measure exposure time in fractions of a second (e.g., 1/50s, 1/500s), traditional cinema cameras and advanced digital rigs use shutter angles (e.g., 180°, 90°, 45°). Shutter angle is preferred in film because motion blur remains proportional regardless of the frame rate.
Narrow Shutters / Fast Speeds (90° or 1/100s+)
A narrower shutter angle (like 90° or 45°) or faster shutter speed reduces motion blur significantly. Each frame is razor-sharp, but rapid movement can look choppy or jittery (the classic "Saving Private Ryan" combat effect).
Wide Shutters / Slow Speeds (360° or 1/24s)
Opening the shutter wider allows more light in and introduces heavy, dreamlike motion trails or ghosting. It increases low-light performance at the expense of crisp motion definition.
Best Settings for Mobile Filmmaking
When shooting cinematic narrative content on a smartphone at 24 fps, always lock your shutter speed to 1/48s (or 1/50s). If shooting action or sports at 60 fps, double your frame rate to 1/120s to maintain natural motion blur.
ISO and White Balance:
Understanding ISO (Sensor Sensitivity)
ISO controls how sensitive your camera sensor is to light. A lower ISO (e.g., ISO 50–100) produces clean, sharp footage in bright sunlight. A higher ISO (e.g., ISO 800–1600+) brightens dark scenes but introduces digital noise and grain, destroying shadow detail.
Understanding White Balance (Color Temperature)
Measured in Kelvin (K), White Balance ensures white objects look truly white under different light sources. Tungsten/indoor bulbs give off an orange hue (~3200K), while daylight or overcast skies look much cooler (~5600K). Locking your white balance prevents jarring color shifts during a shot.
Why Lock ISO and White Balance on Mobile?
Stock phone camera apps use auto-exposure and auto-white-balance by default. As actors move or lighting changes slightly, the phone abruptly shifts brightness and color tints mid-shot (pumping and breathing), ruining your edit. Manual control creates professional continuity.
Real-World Mobile Examples & Best Practices
Bright Daylight: Set ISO to 50–100 and White Balance manually to Daylight (~5600K).
Indoor Warm Lighting: Set White Balance to Tungsten (~3200K) to avoid overly orange skin tones.
Low Light / Night: Keep ISO as low as possible (e.g., 400) and supplement with external portable LED lighting instead of maxing out sensor gain.
Complete Guide to Frame Rates:
24 fps (Cinematic Standard)
The global standard for feature films and high-end dramas. It creates a natural amount of motion blur that the human eye interprets as classic "movie magic." Sticking strictly to 24 fps ensures a unified storytelling aesthetic, consistent motion cadence, and eliminates post-production stuttering.
30 fps (Broadcast & Mobile Standard)
The traditional standard for broadcast television, news, and everyday mobile video recording. It offers slightly higher temporal resolution than 24 fps, making it ideal for standard smartphone videos, vlogs, and online content viewed on mobile devices.
60 fps (Smooth Motion & Action)
Captures crisp, highly fluid motion with minimal blur. Widely used in video games, sports broadcasts, and fast-paced mobile action footage (such as sports or skating). While great for smoothness, it lacks the classic cinematic blur.
120+ fps (Slow Motion & Cinematic FX)
High-frame-rate capture used exclusively for silky-smooth slow motion. When played back at 24 fps, it stretches time dramatically, revealing fine details in explosions, water splashes, or fast athletic movements.
Stop Motion (12 & 24 fps)
Animators often shoot at 12 fps ("on twos") to cut the required workload in half while giving puppets a distinct, handcrafted look, or at full 24 fps for ultra-smooth character motion.
Best Settings for Mobile Filmmaking
For narrative short films on a phone, stick to 24 fps with a locked shutter speed (usually double your frame rate, e.g., 1/48s) to achieve true cinematic motion. For family videos, sports, or content meant for social media scrolling, 30 fps or 60 fps provides clean, responsive playback.
Codecs, Transcoding, H.264 & .MP4 Guide:
What is a Codec & How Does It Work?
A codec (Coder-Decoder) compresses raw, uncompressed video and audio into manageable file sizes using temporal and spatial compression algorithms, then decompresses them during playback and editing.
What is Transcoding?
Transcoding converts digital video files from one format or codec to another (e.g., changing high-overhead formats into editing-friendly proxies). While necessary for compatibility, lossy transcoding can slightly degrade visual quality.
H.264 vs. H.265 (HEVC)
H.265 (HEVC) yields smaller 4K file sizes but demands heavy hardware decoding power. H.264 (AVC) produces larger files, but offers universal compatibility and effortless playback across every platform.
Why We Are Using H.264 for This Challenge
We are sticking strictly to H.264 because its inter-frame prediction requires far less processing power. H.265 often causes timeline stuttering and scrubbing lag, whereas H.264 ensures buttery-smooth editing performance and zero compatibility headaches.
Using the .MP4 Container Format
An .mp4 file is a container format that holds the H.264 video stream alongside your audio and metadata. It is a recognised standard for mobile filmmaking and delivery: it is widely supported by video editors, social media platforms, and web browsers and for this challenge is the codec we ideally need.
Robo-Unit 09 🤖
Mood: Systems Online ⚡